If you are new to Folder Sync 2, this guide should provide you with the basic information you need to get started. Further information is available in the Frequently Asked Questions or by clicking on any of the Categories listed above.
Once you get up to speed on the basics, there are plenty more advanced features to help you sync folders.
If using Folder Sync has helped you out, please consider leaving a positive rating or review on the Mac App Store. Much appreciated, thank you!
App User Interface
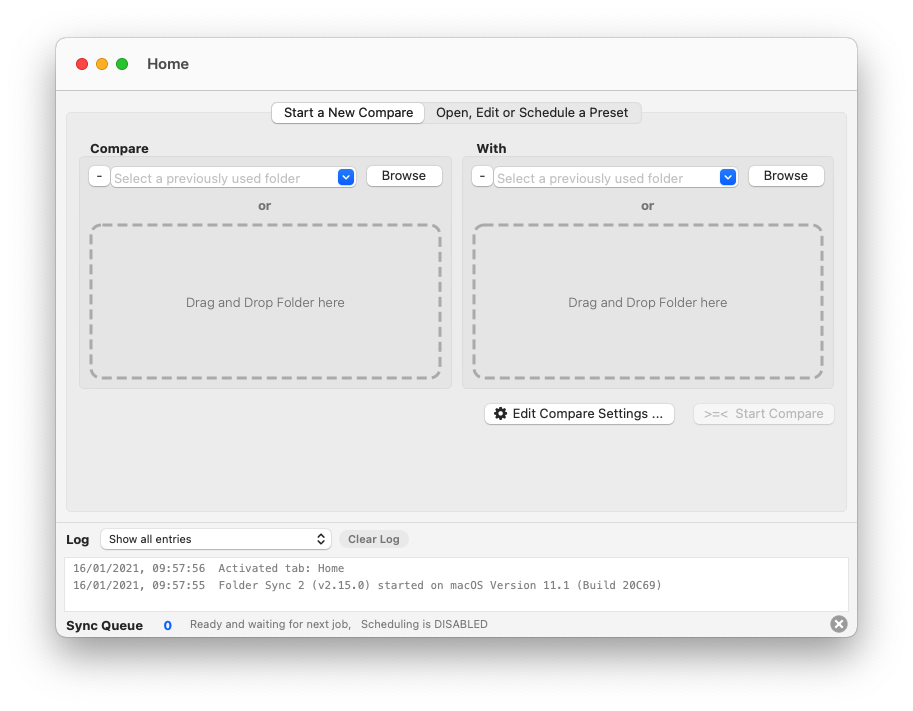
When you first open the app, you will be shown the Home Tab which is split into three main areas :-
- Main Content area - Providing Start New Compare and Open, Edit or Schedule a Preset functionality.
- Log area - Provides in app user feedback. The Log is also permanently saved to file.
- Sync Queue area - Provides real time status and feedback of Sync Queue operations.
Action Menus
Folder Sync uses an Action Menu Button throughout the app to provide access to context specific features.
 is used from macOS Big Sur onwards
 is used in older versions of macOS
Basic App Workflow
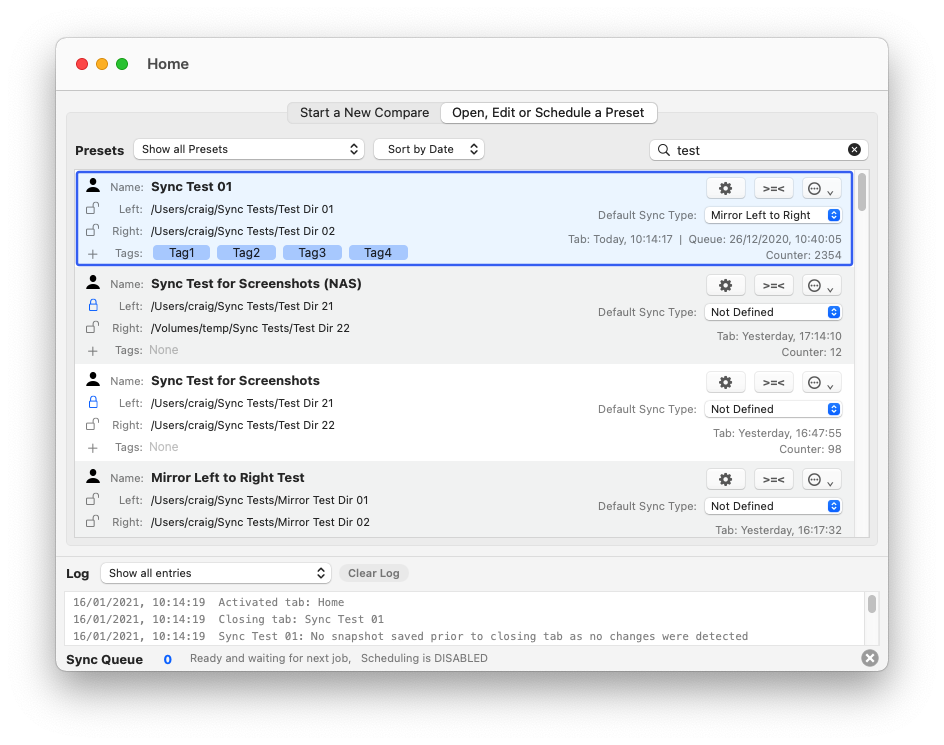
The basic workflow of the app is to use Compare Tabs to compare two folders and to setup and configure Presets. Whenever two folders are compared, a Preset is automatically saved using the default naming format of Compare: /Left/Folder/Path With: /Right/Folder/Path. Presets can be renamed if desired.
Presets are very flexible and allow the user to manage multiple pairs of folders quickly and easily. After configuring a Preset, you can repeatedly run them in a Compare Tab for comparison and Syncing or use the Sync Queue and/or Scheduling to perform these tasks automatically for you with no user intervention required.
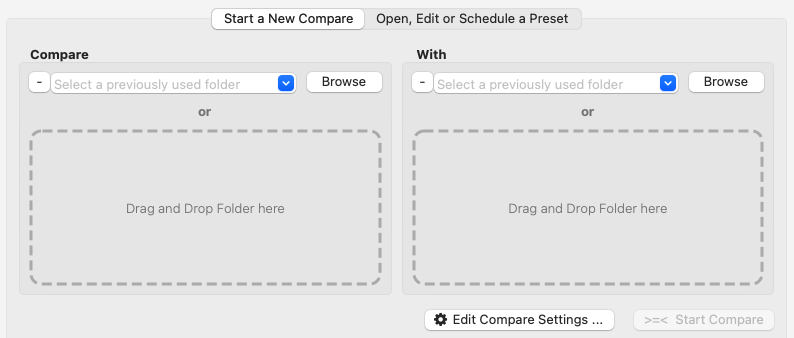
Start New Compare
You can browse for folders, select previously used folders or drag and drop a folder into the drop zones. Once you have two folders specified, the >=< Start Compare button is enabled and you can click on it to open a new Compare Tab and start comparison of the two folders. Folder Sync will automatically create a new Preset for you using the default name format Compare: /Left/Folder/Path With: /Right/Folder/Path.
Open, Edit or Schedule a Preset
The Open, Edit or Schedule a Preset area of the Home Tab provides a convenient way to manage Presets.
Presets can be opened in various ways, the quickest ways are to click on the >=< button or double click on the row representing the preset. See this FAQ for further information.
To edit or schedule a Preset, use the gear button to open the Preset Editor
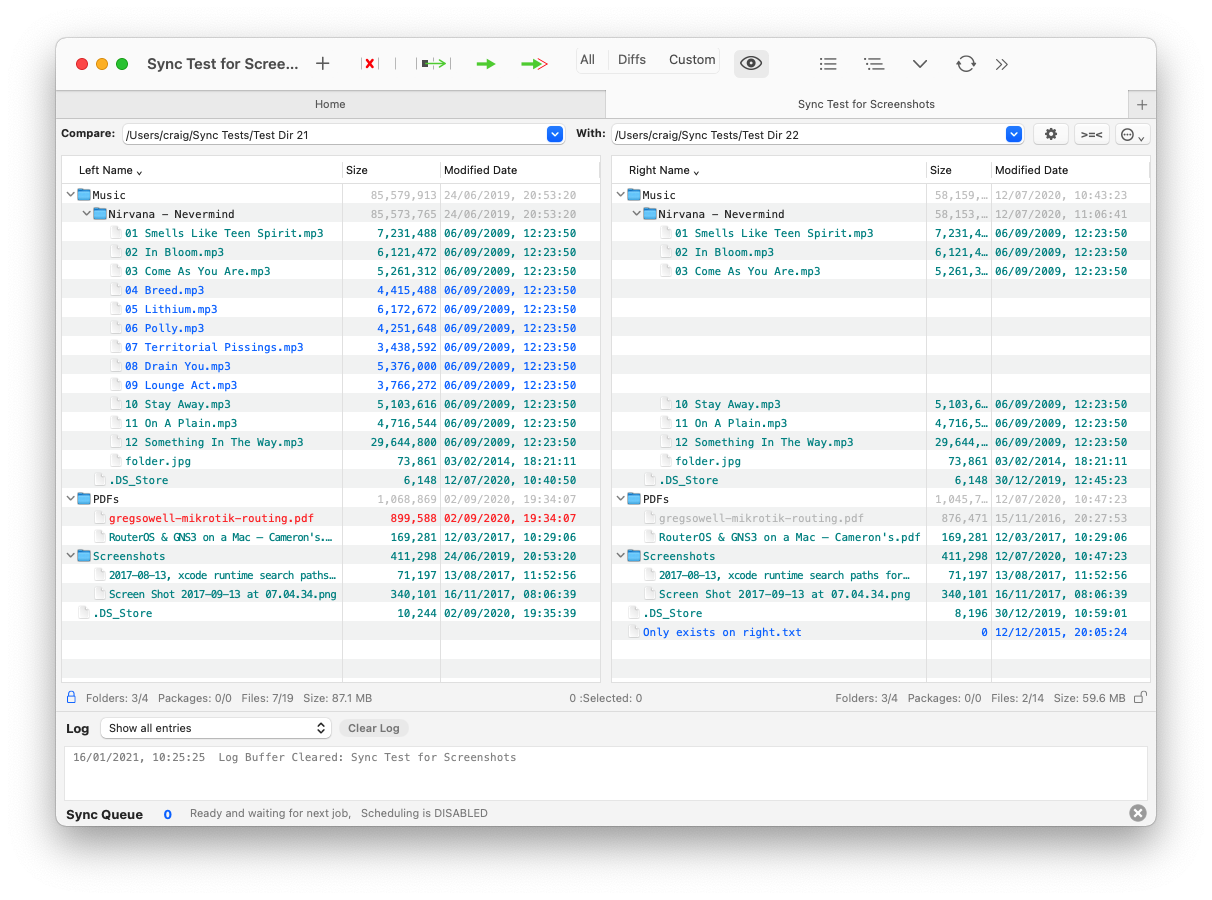
Compare Tabs
After you have started a new compare or opened a Preset, they will open in a Compare Tab showing a visual comparison of the folder contents using configurable colours to feedback the differences between the two sides. Counters at the bottom of each side provide feedback on what has been read from disk.
Note that you can select files and open macOS Quick Look using the space bar to quickly preview any file.
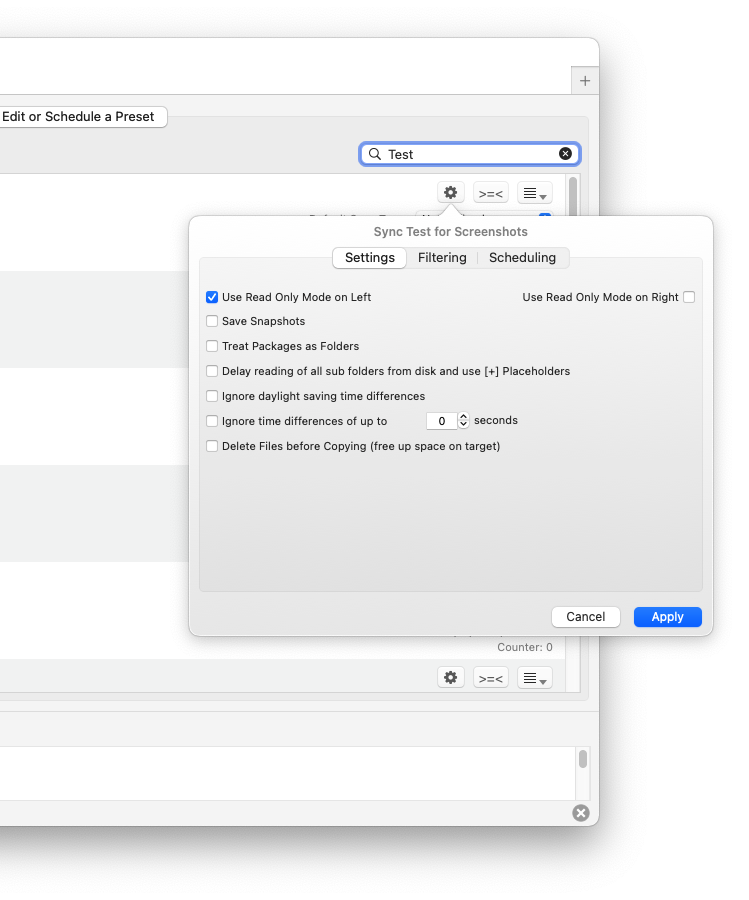
Preset Editor
The Preset Editor is used to configure the Settings for the Preset and/or Filters.
To open a Preset Editor, use the Edit Settings Button  which opens a popup and allows Presets to be fully configured. Edit Settings buttons are available in several locations in the app.
Syncing Files
Folder Sync 2 supports ability to manually manipulate the files (copy, delete, move or rename) within the Compare Tab directly or to use Syncing which will calculate which files require to be manipulated and present that to you in a Sync Preview.
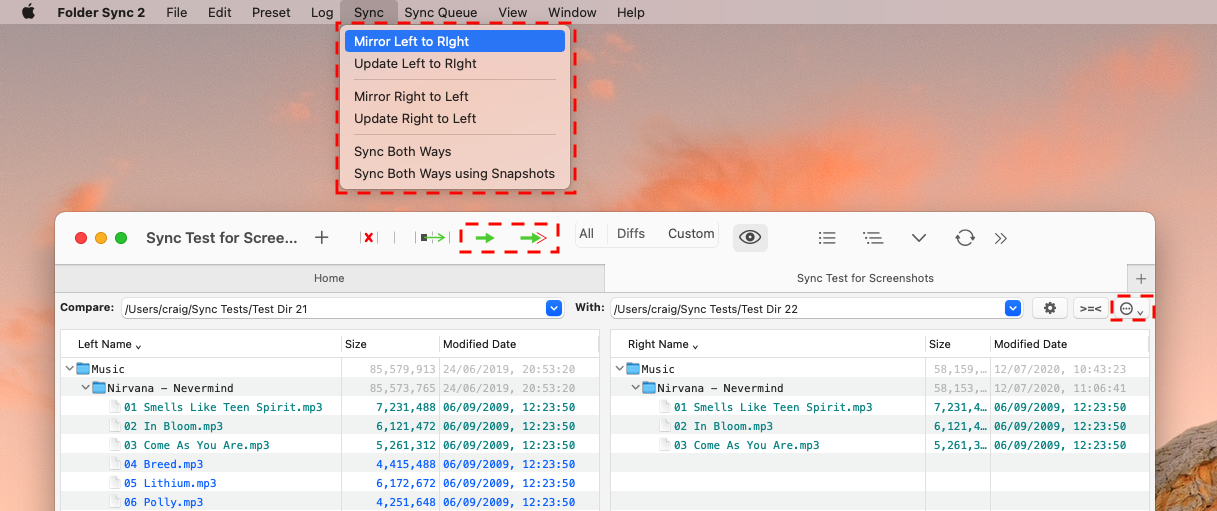
Syncing can be initiated using the Screen Menu, Compare Tab Toolbar or Action Menu Button. As of version 2.4.0, Syncs started from within the outline view context menus also allow you to sync just specific folders and their descendants.
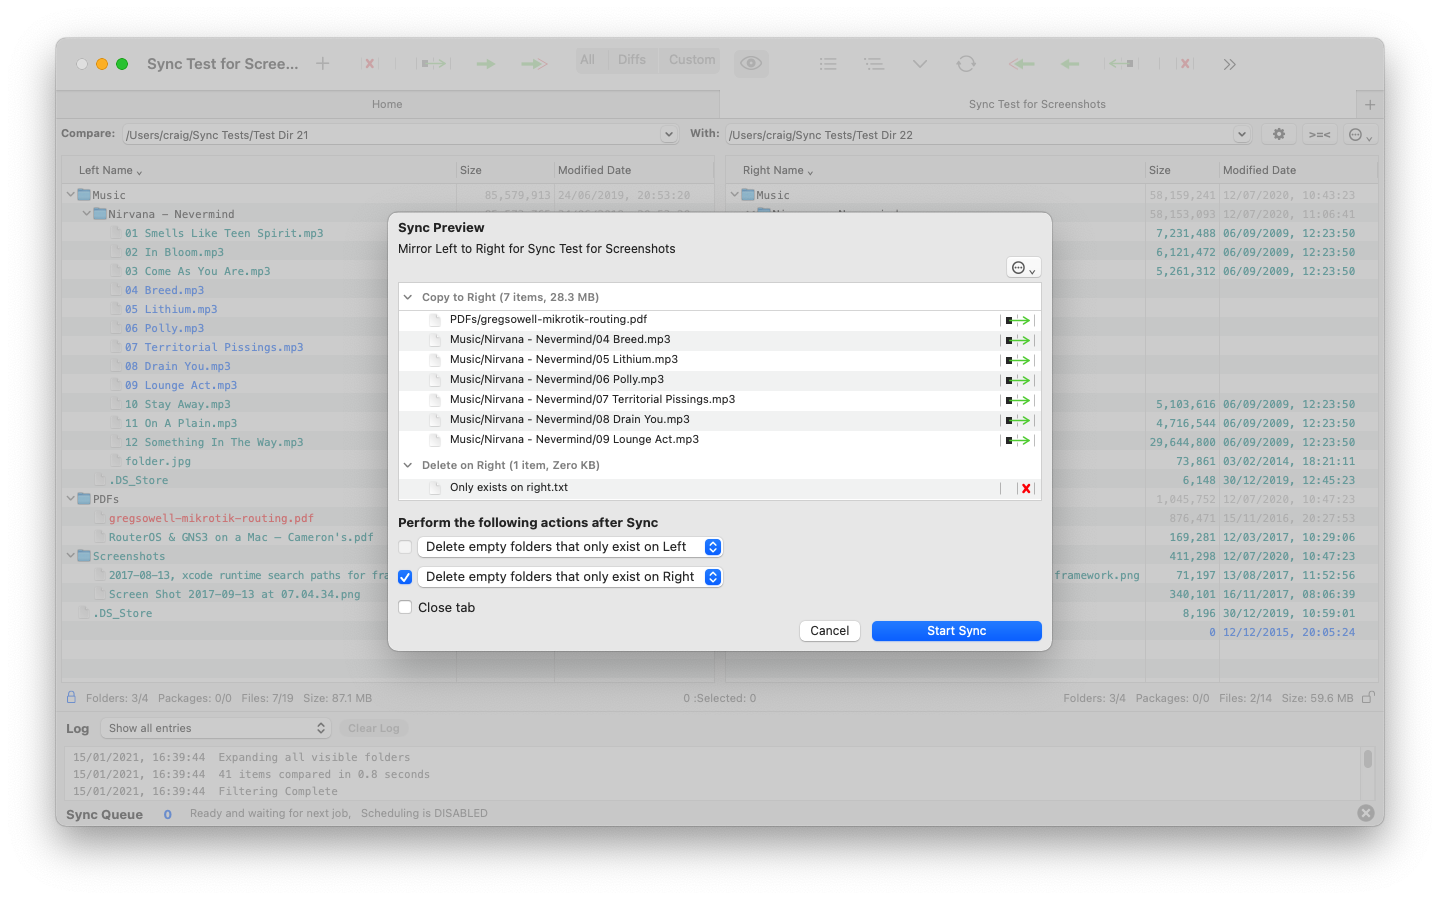
Note that in a Compare Tab, Folder Sync never commits any changes to disk without first showing you a Sync Preview.
If you don’t like what you see in the preview, simply Cancel.
Manual File Manipulation
Copy, Delete, Move and Rename behaves as it would in any typical file management application. For example, if you select items and copy them to the other side, no further intelligence is applied to that copy operation, if you’ve selected something and ask it to be copied, it will be copied.
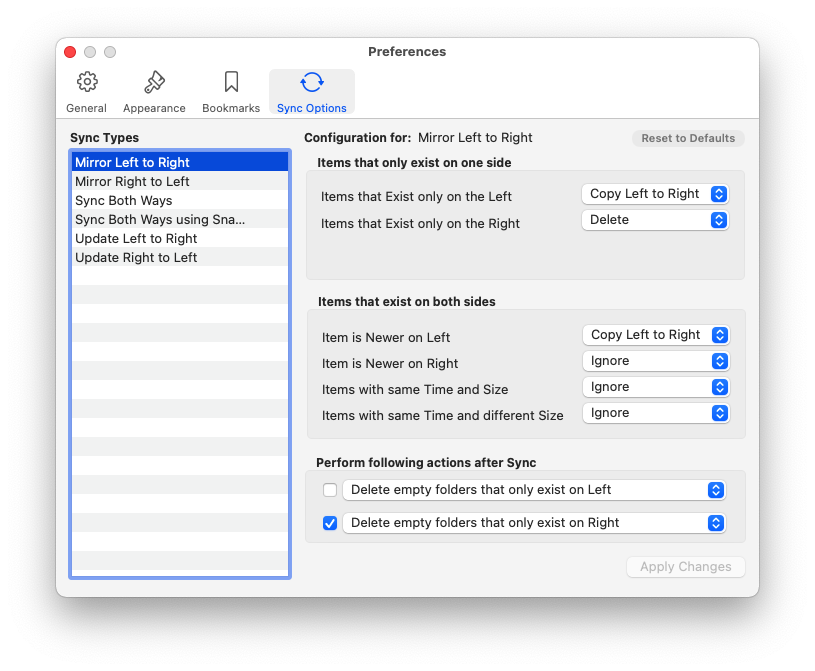
Sync Types
Update and Mirror are the two main Sync Types used. Sync Types can be configured however you want them within the App Preferences to define the rules that are used to calculate what content should be copied, deleted or ignored.
Whilst working within a compare tab, Folder Sync never commits any changes to disk without first showing you the preview and this provides a good safe way to experiment with some test data, to let you see how the various options are working.
The following scenarios illustrate the thinking behind having both an Update and Mirror Sync Type.
Mirror can be used to keep a backup of a folder from your Mac on a NAS box, server or external hard drive.
Update is great for using Folder Sync to consolidate files from multiple Macs into a single folder on a NAS box, server or external hard drive. One example would be that you own several Macs and they have small SSDs so occasionally you want to clean up the downloads folder and move that data off the SSD. In this scenario, you don’t want the source and target to be mirrored, you just want to push all the files on the SSD onto the target drive and once you have confirmation they are safe on the target, removing them form the source to free up disk space.
Sync Preview
All file operations within a Folder Sync Compare Tab are routed through the Sync Preview.
Note that in a Compare Tab, Folder Sync never commits any changes to disk without first showing a Sync Preview for your approval. If you don’t like what you see in the preview, use the Action Menu to edit the items within the sync or simply Cancel and reconfigure the Preset using the Preset Editor to acheive the desired result.
You can select files with the preview and open macOS Quick Look using the space bar to quickly preview any file.
Sync Queue
The Sync Queue is a mechanism to run Preset syncing without requiring user intervention. Presets can be manually added to the Sync Queue by using the Action Menu of a Preset row in the Open a Preset table within the Home Tab. Presets can also be configured to add themselves to the Sync Queue using Scheduling.
The Sync Queue can run multiple jobs in parallel and will feedback its current status to you at the bottom of the Home Tab.

Unlike Compare Tabs, the Sync Queue does not present a Sync Preview for your approval prior to making changes. The recommended workflow is to fully configure Presets using Compare Tabs before using them with the Sync Queue and/or Scheduling.
The Stop button can be used to Abort Presets currently in the Queue.
Note that Aborting a Preset in the Queue will stop the Sync between file operations and will not stop a file operation mid-process so it does not damage files.
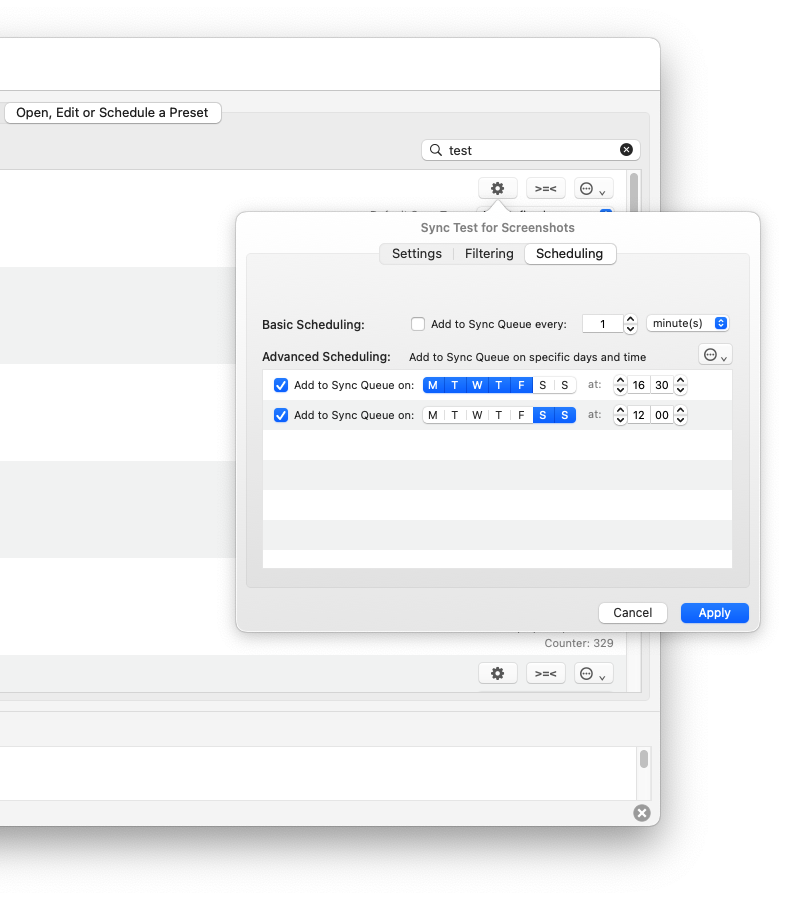
Preset Scheduling
Preset Scheduling uses the Sync Queue to run Presets with no user intervention. A Preset can be scheduled to repeat at user defined intervals or to run at specific days/times. Scheduling options are configured within the Home Tab by editing the settings of the Preset.
Duplicate Finder
As of version 2.12.0, Folder Sync 2 now also includes a powerful Duplicate Finder.
To access the Duplicate Finder, use the File Screen Menu to start a new Duplicate Finder tab. Once open, you can use the Add button to add Folders you want to search. You can also drag and drop folders into the list.
Using the Compare Criteria, you can specify if you want to match files based on their name and size (quick but less accurate) or by file contents (more accurate).
Once you start the Search, note that you can also stop it at any time if you want. All duplicates found are presented in a UI which also supports Quick Look. Once the search is complete (or when you click stop), you can either manually apply a check mark on any files you wish to delete or use the action menu to automatically mark batches of files to delete.
After marking files, use the Delete button to preview all the Files you’ve marked before fully committing to deleting them. Note that Duplicate Finder will not let you delete all copies of a file and does this to prevent accidental deletion.